Building Your Own OpenVPN
I’ve wanted to have a VPN setup for a while - I’ve never been entirely comfortable when using public wifi, even secured public wifi… Open wifi? I feel a little crazy every time I connect. But I usually console myself that I’m not a target, I can make sure important connections are encrypted, and I can just avoid doing some things while on public wifi.
A VPN though, that could make things much easier! All communications would be encrypted between the device I’m using and my VPN endpoint. If I set it up myself, the VPN endpoint would be my home Internet connection. This essentially makes all my browsing look like it’s coming from home, with solid protection between the coffee shop and home… I could do any browsing I wanted without worry! Also, I would essentially be connected to my home network, giving me access to all my devices there.
OpenVPN seems like the popular self-setup VPN, it’s open-source, and there are plenty of tutorials… OpenVPN, that sounds friendly!
It was not.
If you have tried to set this beast up yourself, you know what I’m talking about.
The purpose of this post is to document what I’ve done. This will help me when I, inevitably, have to redo the setup in the future. It may help you if you’re trying to do something similar. First of all, let’s talk about hardware:
- Netgear WNDR3400
- Early 2011 MacBook Pro running OS X El Capitan
- Samsung Galaxy S5
Here’s the software I ended up using on each of these devices to get OpenVPN working:
- DD-WRT v24 “big”
- Tunnelblick
- OpenVPN Connect
“Big” versions of DD-WRT have an OpenVPN server built-in! I’ve been using DD-WRT for years, previously on a few WRT-54G’s, but now I’ve got this N-Netgear (which is great) which also runs DD-WRT. Lucky me!
First - get the above software installed. You’re going to need to do some configuration on each of them, so I’ll describe that next.
Second - generate some keys! Your VPN is going to use cryptographic certificates to secure the communications between all the parts.
Third - setup the server. This is the DD-WRT router, in this case.
Fourth - setup the Mac client. Or whatever client you want…
Fifth - setup the Android client.
How Do These Certificate Things Work?
Here’s how it’s going to work - there’s a “server” end (the router at home - the thing running DD-WRT) and multiple “client” ends (my Mac and my Android). Every one of these parts will have a unique certificate - in my setup I’ve got three certificates. Each client needs its own certificate or OpenVPN will barf - don’t cheap out on me! I learned this from experience.
A certificate sounds like a piece of paper, and you can imagine it that way… It’s like a piece of paper with a big number written on it, that number is a “public” key. There’s a companion piece of info called the “private” key. You can give anyone the public key… It’s like a physical key, that they can use to lock a secret message in a box. BUT - the public key won’t open the box back up once the secret message is in there - because math. The message writer can hand the box to anybody, but no key will open that box again except the private key.
YOU DIDN’T GIVE ANYONE THE PRIVATE KEY, DID YOU? Don’t. The private key opens the box and you can get the message.
So, you could write your certificate out on the Internet and then folks can send you secret messages! That’s how OpenVPN does its thing. Later on, when this thing starts working, you’ll connect to the server and it’ll send you its certificate (so you can send it your browsing requests secretly) and you’ll send the server your certificate (so it can send you the responses to your requests secretly). Again - OpenVPN needs a separate certificate for each client because it’s needly like that.
OpenVPN does another cool thing with these certificates - it determines who’s allowed to connect and use the system. For this purpose you need a fourth certificate called a “certificate authority” (CA) cert. This one is not special, it is the same as the other ones, but OpenVPN uses it backwards. You generate the CA public and private key, and then you encrypt other certificates with that CA private key! Before, remember, we sent secret messages by encrypting (locking the box) with the public key, then only the private key could open the box (decrypt). By encrypting with the private key, now only the public key can decrypt - and nothing can re-encrypt.
This is cool because anybody can open the box and make sure that someone who holds the CA private key wrote the message inside! If anybody changes the message inside, everybody else will know that the new message wasn’t the original. This is called “digitally signing” something. Nobody can change the document you put the CA’s signature on.
How Do We Make Certificates?
Ok! So, that’s how it works, but now how do we set it up on a Mac? Just an aside - this is much easier on a Debian box, and you use the same tools.
Open up a terminal.
mkdir OpenVPNKeys
cp -R /Applications/Tunnelblick.app/Contents/Resources/easy-rsa-tunnelblick/* ./
This makes a place to store everything, and copies over a bunch of tools that will make the job easier. Specifically, this thing called Easy-RSA. Now we need setup some configuration for Easy-RSA. It’s essentially a set of scripts, so we’re going to edit a file with some shell variables in it, then source that file so the variables become part of the environment. I’ll walk you through it.
Edit the “vars” file that’s now in your directory. I prefer vi, maybe you like nano, but use whatever text file editor you want. Leave almost everything as it is, but scroll to the bottom. Change your country, province/state, city, org[anization], and email to be whatever you want, whatever makes sense. Something legit maybe? (maybe?) You don’t have to change most of these things.
There are now the CN, OU and Name fields. Don’t put spaces in these things. Maybe that’s just superstition, but I wouldn’t do it. These fields don’t seem to matter much unless you’re trying to organize a large set of keys across an organization… If you’re reading this you probably aren’t, so you can just leave them alone.
. ./vars
./clean-all
That brings all those variables into the environment so the other scripts can use them, and clears out old config.
./build-ca
./build-dh
These setup the certificate authority certificate and some stuff for the Diffie-Hellman key exchange (look it up suckah!). The first command will ask you a bunch of questions with default answers set to what you put in vars. You can probably just hit enter right through them. This next one is going to ask you some questions too, but again, enter will probably be fine.
./build-key-pkcs12 --pass [someUniqueNameForTheKey]
This step is going to build a certificate for your client to use, you’re eventually going to take what the command outputs and put it on your phone, tablet or laptop. Again, each client needs its own certificate. Replace “someUniqueNameForTheKey” with something related to the client you’re going to put the certificate on - something without spaces in it.
This step is going to ask you for two passwords. The first is the “challenge password”. “Leave it blank”, everyone says! Fools. Leave it blank, I say! Fools run the planet, they seem to know what they’re doing well enough.
No really, leave the first one blank. The second password is the “Export Password”. I recommend putting in a password here… Clients generally ask for this password the first time they use the cert, then don’t need it again. The export password seems to prevent against someone finding the cert and using it, but don’t slow you down from using it.
Build as many certificates as you need. Each of them will be stored in the “keys” directory as a “.p12” file. One cert per client.
How Do We Setup The Server?
Alright, certs are built, now how do we setup our DD-WRT? Login to your router, go to Services->VPN, and make that page look like the one below. (Click on it to get a big version…)
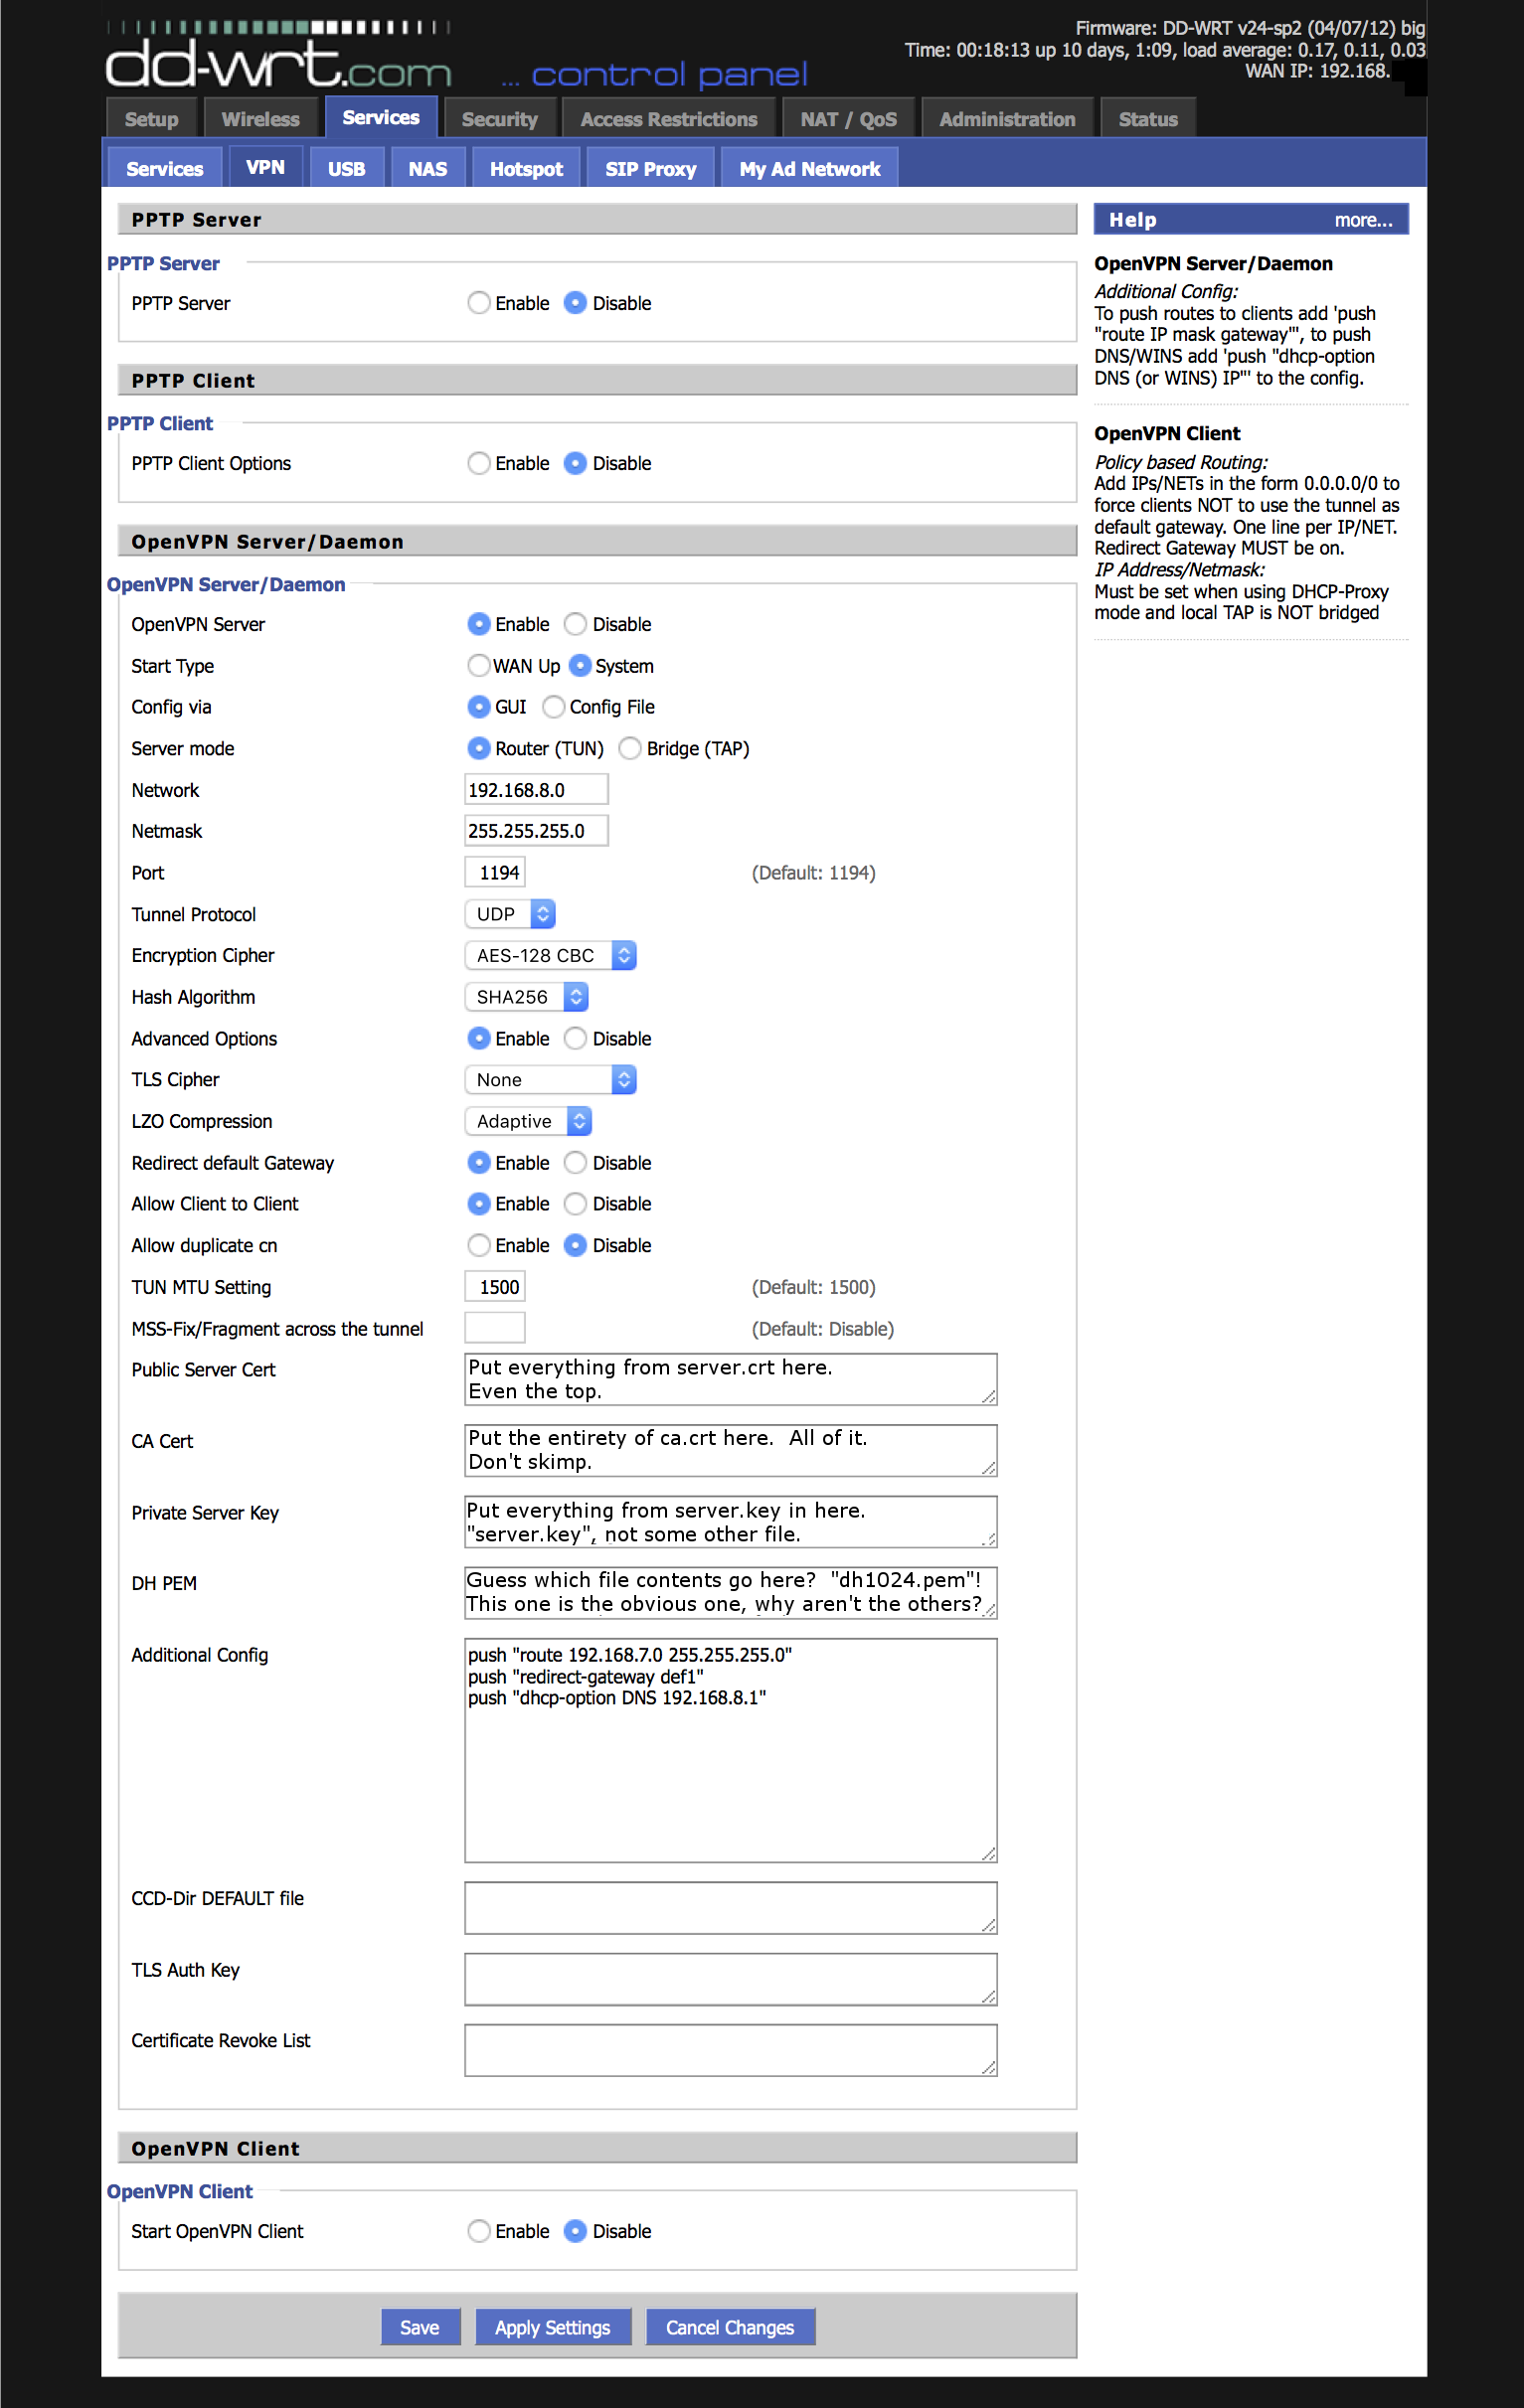
Ok - that image explained where to get the values you need for the crypto settings, but there are a couple other values you should consider changing from my setup… Literally, only two! Easy stuff.
First - you need to change something in the first “Additional Config” line. You need to make this line reflect your internal LAN. You can find that info on the “Setup” tab (don’t forget to save your settings before switching over there!). Take “Local IP Address” and “Subnet Mask” from “Setup”->“Basic Setup”->“Network Setup”->“Router IP” and put it in that first “Additional Config” line in that order.
Next - decide what subnet you want VPN clients to be on. I recommend picking something weird like “192.168.8.0”. This should be different from your internal LAN (see the previous step). If your internal LAN isn’t .8.0, just use the settings I show in the screenshot. To change your VPN client LAN, change “Network” on the VPN page, and change the third line of “Additional Config”.
What is “Additional Config” doing, anyway? It’s telling the server to send any clients that connect (to “push” them) some networking information. Specifically, it’s telling clients how to talk to the internal network and to use the router as the DNS server.
Save the configuration and apply it now.
We’ve got a couple steps left to finish the router configuration, but we’ll need some more information. Specifically, we need to know what the router calls your “tunneling” network adapter. This is a software-based network device that all the traffic is going to flow through. It’s kindof a complicated concept, but it’s like a network connection within a network connection - like it a connection tunneling through your existing connection.
It’s easy to find though. Go to “Administration”->“Commands” on the router admin page. Enter “ifconfig” in the “Commands” box and click “Run Commands”. This will refresh the page slowly and output a bunch of information. Look for a block of text that starts with something like “tun0” or “tun1” and that has your VPN client subnet info near it. It could be any number after “tun”. Mine is “tun0”, so that’s what you’ll see in the rest of this tutorial. Just replace every “tun0” with your specific “tun” entry!
While you’re here, also note what bridge network your local LAN is using. This is probably near the top of the ifconfig output and will be called “br0” or something and will have your local LAN info near it. You just need the basic device, not anything with a colon in it (your router will get colon cancer if you use the colonnaded one (that wordplay was hardcore terrible!)).
So, now we need to fix up the DNS server a little. Go to “Services”->“Services” on your router config. Enable DNSMasq, disable Local DNS, enable “No DNS Rebind”, enter “interface=tun0” in the Additional DNSMasq Options. Remember - use the “tun” you got from the router, don’t just blindly use “tun0”.
Save and apply your configuration.
Now we need to setup some firewall stuff. Go back to “Administration”->“Commands” and enter the following block of text in the “Commands” box. We’re going to edit it a little before running it, though.
iptables -I INPUT 1 -p tcp --dport 1194 -j ACCEPT
iptables -I FORWARD 1 --source 192.168.8.0/24 -j ACCEPT
iptables -I FORWARD -i br0 -o tun0 -j ACCEPT
iptables -I FORWARD -i tun0 -o br0 -j ACCEPT
iptables -t nat -A POSTROUTING -s 192.168.8.0/24 -j MASQUERADE
First - change “192.168.8.0” on the second and fifth lines to be whatever you set your VPN client subnet info to. Why does it have a “/24” afterwards? This is a short way of specifying the subnet mask 255.255.255.0. Hopefully you used that subnet mask with the VPN client subnet… Otherwise you’re on your own suckah! (If you used a different subnet, you can calculate the right “/” to put in there, it’s called CIDR Notation, and here’s a calculator for you)
Second - change the instances of “br0” and “tun0” on the third and fourth lines to reflect your router’s bridge and tunnel interfaces.
Run commands, save firewall, now the new firewall config should show up right below the “Commands” box.
Ok, so that took a while, but hopefully it was pretty much straightforward. We’re done with the router!
Setup the Mac Client
Tunnelblick is not tough to use, and neither is the Android client. Many OpenVPN clients use the configuration filetype “.ovpn”. We’re going to build a version that will work for both Tunnelblick and Android, and all you’ll have to do is change the certificate file name.
I had to use a bunch of trial-and-error and Internet tutorials to figure this out and make it work, but I think the configuration below will work for most OpenVPN clients.
Make a file with the following contents:
client
dev tun
proto udp
port 1194
remote yourRoutersExternalAddress
resolv-retry infinite
nobind
persist-key
persist-tun
remote-cert-tls server
comp-lzo
verb 1
reneg-sec 0
pull

pkcs12 clientKeyFileHere.p12

cipher AES-128-CBC
link-mtu 1570
auth SHA256
Change the line “pkcs12” to be the name of one of your client .p12 certificate/key files. Change the line “remote” to reflect your router’s external Internet address - the address other folks on the Internet can use to talk to your router. Save this configuration file with a name like “macbookConfiguration.ovpn”.
Alright - back to the Mac specific part! Copy the ovpn and p12 files for your Mac to the Mac. Double click the ovpn file. Tunnelblick will open up and import the configuration. Click “connect” in Tunnelblick. It will ask you for the “export password” you put in when you created this client certificate - enter that. Tunnelblick should connect to your VPN now .(Probably don’t try this stuff on your local LAN, although that might work just fine. Probably try it at a nearby coffee shop with wifi, or on your neighbor’s wifi.)
That’s it. Your Mac is setup and VPN’d to your home Internet connection! Prove it by going to Google and searching for “what is my IP address”. Google should give you the same IP address now, when you’re not physically at home but VPN’d there, as it does when you’re at home.
Setup the Android Client
Build an “ovpn” file in the same way we did for the Mac, but using your Android certificate. Copy the ovpn and p12 files over to your Android. Open “OpenVPN Connect” on your Android, and click the “…” up in the upper right. Click “Import”. Select “Import PKCS #12 from SD card”. Browse to your p12 file and click it. Enter the password. Go back to the OpenVPN Connect home screen and click the “…” again. Click Import and this time “Import Profile from SD card”. Select the ovpn file you copied over.
Click “Connect” on the OpenVPN Connect home screen.
That’s it! Your Android is setup! Prove it using the google IP address trick we used in the Mac section at the end.
Something to watch out for - if you connect to the VPN while you’re on your cell network, then you move in range of a wifi network and intend to use that network, you must disconnect from the VPN, wait a second, and reconnect. After reconnecting the VPN it should be running over the wifi network.
Conclusion
So, I hope I gave you enough detail and walkthrough to figure out how to setup your VPN successfully. It took me a pretty significant amount of research and time to set the damn thing up, so hopefully I’ve saved you some time. There are a lot of tutorials out there that cover parts of this setup, but this is the first I’ve seen that goes all the way start to finish explaining each step.
What if this doesn’t work for you? Well, you can email me. I’ll try to help. Probably. If I’m not busy. Better - try to troubleshoot it. This VPN is a system of systems, so lots of parts can go wrong. Let’s walk through a few.
Troubleshooting
I got the server and clients setup, but neither client will connect to the server - Cool, I bet this is a server problem! First step - remember that the server is your home router. Is it working and connected to the Internet at home? Did the router change addresses since you built your OVPN file (dynamic DNS services can help solve this problem, but that’s for a different tutorial)? Can you ping your router while you’re not at home (you’ll have to disable “Block Anonymous WAN Requests (ping)” under “Security”->“Firewall” to try this, enable it again when pings work from the outside, because enabling this setting is a little more secure)?
Second step - use Tunnelblick’s “Log” tab to help you figure out what is breaking and where. Some of the output is right there in the tab, some of the output is spit into a separate file that is referenced there on the log tab. Search for the warnings and errors and Google them. Here are some of the things this log can help you fix, in the order that you should check/fix them.
2.1 - Can Tunnelblick start talking to your home router, or does the connection break before that even happened?
2.2 - Can Tunnelblick start the exchange of session parameters? This is where your client tells the server what kind of stuff it will accept, and the server tells the client the same. Do you see that kind of exchange happening?
2.3 - Are the server and the client telling each other they can use the same session parameters? In my experience, the client and server had to be specifying the exact same parameters.
2.4 - Is the crypto all working out? Maybe the certificates are in the wrong place on the server…
The router also has a server log on it, and that can help too. It will tell you some similar things.
I got the server and clients setup, but one of the clients won’t connect and the other will!
The problem probably lies with the broken client. Maybe Googling stuff in its log file will help you?
One of the clients connects, but when I connect the second client it boots the first off after a short period!
You probably are trying to use the same certificate/key for both clients. Don’t do that.
Comments:
finity - Mar 6, 2016
I am pretty careless with the difference between certificates and keys… For folks that are new to this - there is a difference. A certificate contains a key. The private keys here don’t have certificates.